Want to get your YouTube videos onto Instagram without the headache? The smartest way is to use an automation tool like PostOnce, which automatically crossposts your content from one platform to many others. It can link your accounts and handle the heavy lifting, turning your long-form videos into a steady stream of Reels or Stories. It's the "set it and forget it" solution for creators who want to maximize their reach efficiently.
Your Playbook for Repurposing YouTube Videos on Instagram
In this guide, I'll walk you through two paths. First, we'll dive into how to use a tool like PostOnce for a completely hands-off workflow. Then, for those who like to get their hands dirty and have more creative control, I'll break down the manual process step-by-step.
We'll cover everything from getting your video files ready and wrestling with Instagram's unique format requirements to writing captions that actually get people to comment and share. By the end, you'll see your YouTube library not just as a collection of old videos, but as a goldmine of content ready to fuel your Instagram growth.
The Fast Track: Using a Direct Tool like PostOnce
Let's be real—the biggest hurdle here isn't just moving a file from one place to another. It's about completely reshaping that content to feel native to a different platform. You have to think about aspect ratios, video lengths, and even the cultural expectations of the audience.
This is exactly the problem a tool like PostOnce was built to solve. It bridges the gap by automating all those tedious, time-sucking steps.
Instead of spending hours downloading, trimming, reformatting for vertical view, and then finally uploading, PostOnce connects directly to your accounts. It's smart enough to handle the conversion from horizontal to vertical, tweak your captions for Instagram, and even schedule everything out. It's the most efficient way to post videos from YouTube to Instagram, period.
Why Bother Repurposing YouTube Videos for Instagram?
Look, I get it. The idea of posting the same content on different platforms can feel a bit lazy, or worse, like you’re spamming your audience. But trust me, that's not how it works in reality. When you slice up your YouTube videos for Instagram, you’re not just saving time—you’re playing a much smarter game.
You're taking one great piece of work and giving it new life, new context, and a new chance to connect with people. It’s about maximizing the value of the effort you've already put in.
You're Talking to the Same People
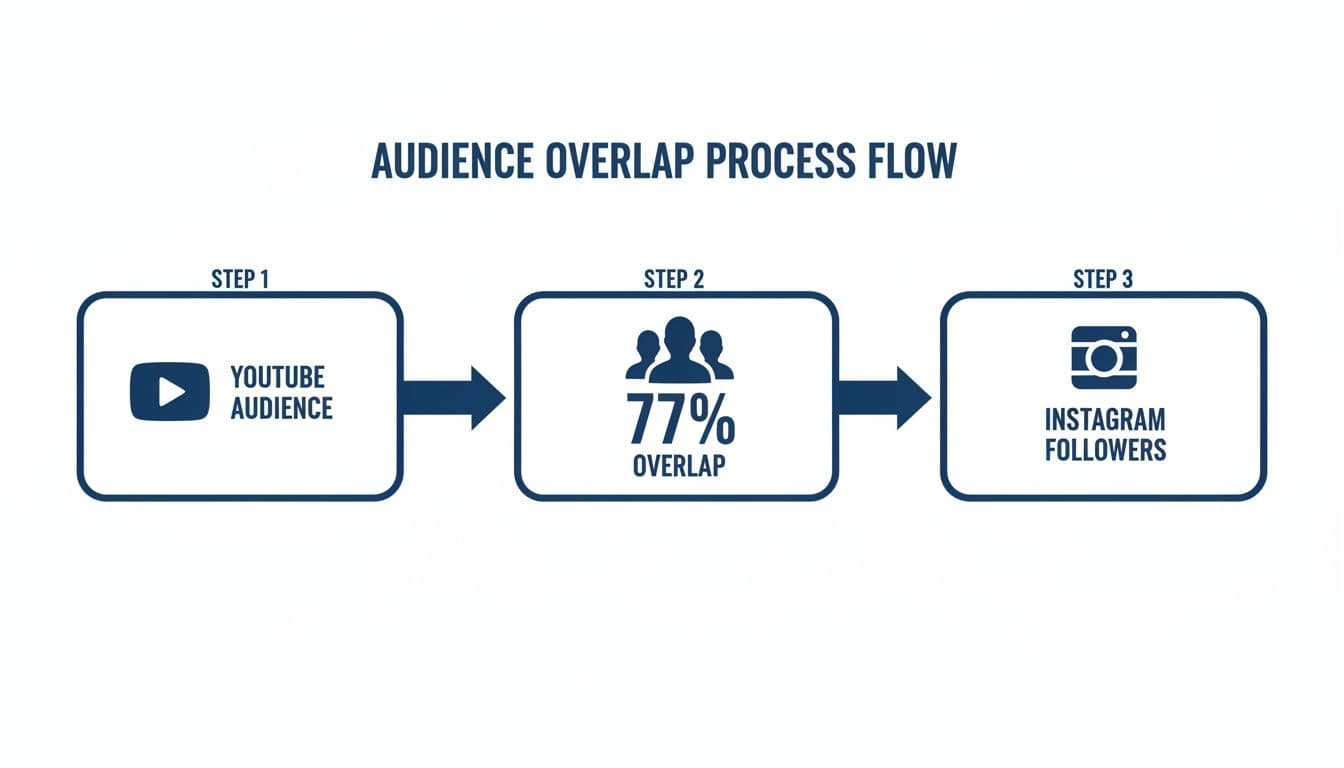
Here’s the biggest secret most creators miss: your YouTube subscribers and your Instagram followers are very likely the same people. You’re not trying to reach two completely different crowds. You’re engaging one big, overlapping community that just happens to hang out in different digital spots.
The numbers don't lie. Instagram has over 2 billion monthly users, and YouTube is sitting at a massive 2.5 billion. But the really interesting part? A staggering 77% of YouTube users are also on Instagram. Think about that for a second. Fewer than 2% of people are loyal to just one of these platforms.
This means when you post a highlight from your latest YouTube deep-dive as a Reel, you're not annoying anyone. You’re actually reinforcing your message with an audience that already knows and likes your stuff.
Seeing the same idea in both a long-form YouTube video and a short-form Instagram clip is powerful. It caters to different moods—whether someone has 10 minutes to spare or just 30 seconds to scroll.
Playing to Each Platform's Strengths
YouTube and Instagram are built for different things. YouTube is the home of deep, searchable content that builds your authority over the long haul. Instagram, especially with Reels and Stories, is a discovery machine designed for fast, entertaining, and highly shareable moments.
By repurposing, you get the best of both worlds.
- Create a breadcrumb trail: A killer Reel can act as a teaser, getting people hooked and sending them straight to your YouTube channel to watch the full video.
- Stay top of mind: Seeing your brand consistently across different feeds makes you more memorable. It’s simple brand recall, and it works.
- Keep the algorithm happy: Instagram's algorithm loves it when you post consistently. A steady stream of repurposed clips keeps your account active and pushes your content to more people.
This isn’t about just copy-pasting. It’s about creating a powerful feedback loop where your success on one platform directly boosts the other.
To get the full picture, check out our guide on building a rock-solid content repurposing strategy. The goal isn't to create more work for yourself; it's to make the work you're already doing go so much further.
Getting Your YouTube Video Ready for Instagram
You can't just toss a YouTube video onto Instagram and call it a day. The two platforms are completely different beasts. What works as a 15-minute, horizontal deep-dive on YouTube is going to feel out of place and get ignored in Instagram's fast-scrolling, vertical world.
To make this work, you need a crucial middle step: preparation. It's all about getting your video file and then completely reshaping it so it feels native to Instagram—like you made it just for that audience.
First, Get Your Hands on the Video File
Before any editing can happen, you obviously need the video file itself. You’ve got a couple of ways to do this, but one is clearly the winner.
-
The Best Way: Use the Original Source File. This is your golden ticket. The original, high-resolution file you first uploaded to YouTube is the cleanest, highest-quality version you have. It hasn't been compressed or processed by YouTube, giving you the most flexibility when you start editing. Always, always try to start here.
-
The Backup Plan: Download from YouTube. If that original file is long gone (it happens!), you can download your own video directly from your YouTube Studio. Just be incredibly careful about downloading content that doesn't belong to you. Grabbing someone else's video without their direct permission is a fast track to copyright trouble.
So why go through all this effort? Because your audience is already there. A huge chunk of your YouTube subscribers are probably scrolling through Instagram right now.
Research shows a massive 77% of your YouTube audience is likely on Instagram, too. This isn't about finding a new audience; it's about meeting your existing one where they hang out.
From Landscape to Portrait: Reformatting for a Vertical World
Once you've secured your video file, the real creative work starts. Your main challenge is turning that wide (16:9) YouTube video into a tall (9:16) clip that beautifully fills a phone screen.
Don't just slap the horizontal video in the middle of a vertical frame with ugly black bars on the top and bottom. That immediately screams "lazy repurposing" and tanks engagement.
Instead, you need to completely reframe the shot. This usually means "punching in" or zooming into the most important part of the video and making sure it stays centered. If it's a talking-head video, your vertical cut should keep your face as the focal point, cropping out the non-essential background on the sides.
Key Takeaway: Your goal is to make the repurposed clip feel intentional, not like a sloppy afterthought. Every cut, crop, and caption should be designed for the Instagram viewing experience: fast, mobile, and often silent.
To help you keep the technical details straight, here's a quick cheat sheet for Instagram's video formats.
Instagram Video Format Cheat Sheet
This table is a great reference to have handy. It breaks down the specific requirements for each type of Instagram video, ensuring you’re always optimizing for the right placement.
| Video Format | Aspect Ratio | Maximum Length | Best For |
|---|---|---|---|
| Reels | 9:16 | 90 seconds | Short, high-energy clips, trends, educational snippets |
| Stories | 9:16 | 60 seconds per slide | Behind-the-scenes content, Q&As, interactive polls |
| Feed Video | 1:1 or 4:5 | 60 minutes | Longer tutorials, mini-documentaries, in-depth content |
| Instagram Video (formerly IGTV) | 9:16 | 60 minutes | Long-form vertical content, episodic series, interviews |
Having this handy will save you a ton of headaches and ensure your video looks perfect every single time.
Make Your Video Impossible to Ignore
Remember, a silent video is often a skipped video. With so many people scrolling with their sound off, you need to add visual elements that grab attention and deliver your message.
-
Burn in Dynamic Captions: Don't rely on Instagram's auto-captions. Use your editing software to add captions directly onto the video file. This ensures everyone can understand your content, sound on or off.
-
Hook Them with a Headline: Add a bold text overlay at the very top of the screen. This is your chance to stop the scroll in the first three seconds. Think of it like a mini-headline: "My Biggest Podcasting Mistake" or "3 Ways to Fix Your SEO."
-
Be Brutal with Your Trimming: That 12-minute YouTube masterpiece has dozens of potential Reels hiding inside it. Your job is to be a ruthless editor and find that one golden 30-to-60-second nugget that's incredibly valuable, funny, or surprising. Isolate it and cut everything else.
Getting these edits right is what separates content that gets lost in the feed from content that gets discovered. If you want to get into the nitty-gritty of the technical specs, you can learn much more about the proper format for Instagram video in our full guide. A little extra effort here makes all the difference.
Writing Captions and Hashtags That Boost Discovery
A perfectly edited video is only half the battle. After all that work, it's the caption and hashtags that will actually get your YouTube clip seen on Instagram. Without a killer caption to stop the scroll and a smart hashtag strategy, even the best content can end up shouting into the void.
This is another spot where a tool like PostOnce can be a huge time-saver. It can automatically add your go-to caption templates and hashtag sets when it cross-posts your videos. But if you're writing them from scratch, let's break down how to make your words work just as hard as your video.
Crafting the Perfect Instagram Caption
Your caption has one job: grab someone's attention in the very first line. People scroll fast. You need a hook that makes them hit the brakes.
Your opening line has to spark curiosity or promise a clear benefit. Ditch the boring descriptions and lead with a provocative question or a bold statement.
- Weak Hook: "Here's a clip from my latest YouTube video about baking."
- Strong Hook: "You've been making sourdough all wrong. Here's why."
See the difference? It’s about creating intrigue, not just describing the content. Once you’ve hooked them, the rest of the caption can add context, tell a quick story, or push them to do something. Usually, the goal is to drive them back to YouTube, so a clear call to action (CTA) like "Watch the full breakdown on my channel—link in bio!" is a must.
Building a Winning Hashtag Strategy
Hashtags are basically Instagram’s search engine. They connect your video with people who are actively looking for what you’re talking about. I see a lot of people make one of two mistakes: either using way too few hashtags or only using massive, generic ones.
A much smarter approach is to use a strategic blend that hits different levels of specificity.
- Broad Hashtags: Think big, with millions of posts (e.g., #videomarketing, #youtuber). They give you a shot at massive visibility but you’re competing with everyone.
- Niche Hashtags: These are hyper-specific to your topic (e.g., #beginneryoutuber, #davinciresolvetutorial). The audience is smaller, but they're way more engaged and looking for exactly what you offer.
- Branded Hashtags: This is your own unique tag (e.g., #MyBrandTutorials). It’s great for building a community and letting followers easily find all of your related content in one place.
Don't just copy and paste the same 30 hashtags on every single post. The algorithm rewards relevance. Taking a minute to tailor your hashtags to the specific clip you're posting signals that your content is a great match for certain interests, and you'll see better results.
Figuring out the right number and mix of hashtags can feel a bit tricky. For a much deeper dive, check out our guide on how many hashtags to use on Instagram, where we really get into the data behind a solid strategy.
By turning your YouTube videos into Instagram Reels, you’re tapping directly into the most powerful trend on the platform right now: short-form vertical video. Reels are, hands down, the highest-engagement format on Instagram, crushing photos and old-school video posts. Studies show Reels can deliver 35% more engagement than standard videos and can reach over 30% of your followers. You can learn more about these powerful trends in Instagram engagement and see how they can completely change your game.
Let PostOnce Handle the Heavy Lifting For You
Let's be real: manually downloading, editing, and re-uploading every single video clip is a massive time sink. The smartest way to get your YouTube videos onto Instagram is to let an automation tool like PostOnce handle the entire workflow. Imagine this: you publish a new video on your channel, and moments later, perfectly formatted clips just show up on your Instagram profile. No extra work needed from you.
This isn't just a simple scheduler. Think of it as a complete content repurposing engine. PostOnce plugs directly into your accounts, letting you build powerful 'set-and-forget' rules that work quietly in the background, turning one piece of content into many.
This kind of organized, efficient setup is exactly what you get when you use a dedicated tool to stay consistent without burning out.
The Real Problem We're Solving
When someone searches for "post videos from YouTube to Instagram," they aren't just trying to move a file from A to B. They're trying to solve a frustrating, time-consuming problem. Creators need a bridge between two totally different platforms, and they don't want to spend hours on repetitive tasks to build it. PostOnce was designed from the ground up to be that bridge.
Instead of a clunky, multi-step manual process, PostOnce boils it all down to a single, automated action. It intelligently reframes your horizontal video for a vertical screen, adapts your text for punchy Instagram captions, and even applies the hashtag strategies you've already defined.
Setting Up Your Automation Rules
Getting this all set up is surprisingly simple. Inside the PostOnce dashboard, you just connect your YouTube and Instagram accounts. Then, you tell it what you want it to do by setting up triggers.
A super common trigger is just, "When a new video is published on my YouTube channel." Easy enough. From there, you get to customize what happens next.
- Content Formatting: Tell PostOnce to automatically reframe your 16:9 video into a 9:16 vertical clip—perfect for Reels.
- Caption Templates: You can build dynamic caption templates that pull the title or bits of the description straight from your YouTube video.
- Hashtag Groups: Save different sets of hashtags that PostOnce can automatically add to your posts. You’ll never forget to optimize for discovery again.
This isn't just a blunt automation tool; it gives you a ton of control so your automated content never feels robotic or out of place. While we're talking about automation, it's worth seeing how different tools approach this. For example, you can learn about the specific features of Copycat247 to get a feel for how different platforms handle customization.
By automating the tedious parts of content distribution, you free up mental energy and time to focus on what actually matters: creating high-quality, long-form content for your primary platform, YouTube.
How It All Works in Practice
Let’s walk through a real-world example. Say you're a creator who just dropped a 15-minute product review on YouTube.
As soon as that video goes live, PostOnce jumps into action. Based on the rules you set up, the system might automatically pull a juicy 60-second highlight clip from your review.
Then, it adds your pre-written intro hook to the caption, pulls in the video's title, and tacks on your saved "#productreview" hashtag group.
Finally, that perfectly formatted Reel is either posted instantly or scheduled to go live on your Instagram account—all within minutes of your original YouTube upload. The entire thing happens without you having to do a single thing.
For any creator who's serious about staying active on Instagram while trying to grow a YouTube channel, this kind of workflow is a game-changer. You can find out more about how to specifically set up a YouTube to Instagram workflow and see just how powerful these connections can be for your strategy.
Playing by the Rules: Copyright and Platform Etiquette
It’s easy to get excited about sharing your YouTube videos on Instagram, but moving content between platforms means you’ve got to play by the rules. Getting this part wrong can lead to muted audio, strikes against your account, or worse, legal headaches.
The core principle here is simple and absolute: you can only repurpose content that you own the rights to. This means you filmed it, you created the graphics, and you have explicit permission to use every single element within it—especially the audio.
At the end of the day, understanding what intellectual property protection entails is the foundation of any smart content strategy. It's about protecting your brand and respecting the work of other creators.
The Music Licensing Trap
One of the biggest hurdles I see creators stumble over is music. Just because you properly licensed a song for your YouTube video doesn't automatically mean you have the rights to use that same song on Instagram. Music licenses are almost always platform-specific.
If you use a track without the right permissions on Instagram, its Content ID system will likely mute your audio in a heartbeat. It's incredibly fast and efficient at flagging unauthorized music.
The safest—and smartest—move is to use Instagram's own music library. When you upload your edited clip, just mute the original audio and add a trending track directly inside the Reels or Stories editor. This ensures you’re using pre-cleared music and keeps your content safe from takedowns.
Keeping It Real and Native
Beyond the legal stuff, you also need to make sure your repurposed content doesn't feel like a lazy copy-paste job. Nothing screams "I don't care about this platform" louder than a video that clearly wasn't made for Instagram.
Your aim should be to make every post feel like it belongs there. This means sidestepping the common cross-posting mistakes that tell your audience they're just an afterthought.
Key Insight: Authenticity isn't about creating brand new content from scratch every single time. It's about respecting the unique culture of each platform and tailoring your content to meet the audience's expectations.
Common Cross-Posting Mistakes to Sidestep
A few simple tweaks can make a huge difference in how your audience perceives your repurposed videos. Try to avoid these all-too-common slip-ups:
- Platform-Specific Cues: Ditch any language that doesn't belong on Instagram. Captions like "link in description" or "watch the full video on my channel" are dead giveaways. Since Instagram captions don't have clickable links, this just creates a frustrating experience. Always use "link in bio" instead.
- Forgetting to Engage: Don't just post it and forget it. If your Reel starts getting comments and questions, jump in and respond. Your Instagram followers expect to interact with you on Instagram, not just back on YouTube.
- Skipping Attribution: If your video features content from another creator (and you have their permission!), make sure you tag and credit them in your Instagram caption. It’s not just good manners; it's how you build community and show respect.
By keeping these guidelines in mind, you can build a repurposing strategy that's both effective and sustainable. For a deeper dive, check out our guide on the best practices for crossposting on social media.
Got Questions? We've Got Answers
When you start repurposing your YouTube content for Instagram, you're bound to run into some specific questions. Let's tackle some of the most common ones I hear from creators so you can sidestep any potential issues.
Can I Just Post My Entire YouTube Video on Instagram?
Technically, yes, but you really shouldn't. While Instagram's main feed allows for videos up to 60 minutes, slapping a full-length, horizontal YouTube video onto a vertical platform is a recipe for low engagement. It just looks out of place and will get scrolled past.
Think of it this way: create a custom, vertical highlight clip specifically for Reels instead. Use that exciting, fast-paced teaser to hook viewers and point them back to your YouTube channel for the full experience. This plays to the strengths of both platforms.
What’s the Best App for Turning YouTube Videos into Instagram Content?
If you're looking for a "set it and forget it" approach, an automation tool like PostOnce is your best bet. You set it up once, and it handles the entire workflow for you automatically. It's a massive time-saver.
For those who prefer to get hands-on with the editing process, you've got some fantastic options:
- Editing on Your Phone: Apps like CapCut, InShot, and Splice are incredibly powerful right on your phone. They make it super easy to crop your horizontal video to a vertical format, add text, and trim your clips.
- Editing on Your Desktop: If you need more fine-tuned control, Adobe Premiere Pro and DaVinci Resolve are the professional go-to's. For a surprisingly capable free option, Clipchamp is a great choice.
How Do I Handle Music and Avoid Copyright Strikes on Instagram?
This is a big one. Pay close attention here, because getting this wrong can get your content muted or even taken down. The music license you secured for YouTube almost never carries over to Instagram—licenses are usually platform-specific.
The only truly safe way to handle this is to use music directly from Instagram’s own audio library. When you upload your Reel, mute the original audio from your video file and simply add a new, pre-cleared song from within the app.
If your video's dialogue or original audio is essential, make sure to export it from your editor without any background music. That way, you can add an Instagram-approved track on top during the upload process without losing your voiceover.
Should I Post My Clips as Reels or Feed Videos?
For getting new eyes on your content, Reels are the clear winner. The algorithm is built to push Reels out to people who don't follow you yet, which gives your clips a much better shot at reaching a wider audience and even going viral.
Feed videos, on the other hand, are mostly shown to your existing followers. They're great for delivering deeper value to your current community, but they just don't have the same organic reach as Reels. My advice? Prioritize Reels for all your short, attention-grabbing highlights from YouTube.
This whole strategy of cross-posting is backed by huge industry trends. Instagram is on track to pull in over $43 billion in ad revenue, and YouTube clocked nearly $30 billion back in 2022. That kind of money follows user attention, and right now, social video is king. It's driving product discovery and influencing the buying decisions of over 55% of consumers. With user-generated content influencing a whopping 79% of purchases, turning your authentic YouTube videos into Instagram content isn't just a good idea—it's a smart business move. You can dig into more of these social commerce trends in these marketing statistics from Shopify.
Tired of the manual grind of downloading, editing, and re-uploading? PostOnce can put your YouTube-to-Instagram workflow on autopilot. Connect your accounts, tell it what to do, and let the platform take over. Start automating your social media with PostOnce today.