The official YouTube video size limit is 256 GB or 12 hours, whichever is less, for verified accounts. If your account is not verified, the practical limit is 15 minutes per upload. File size and video length are separate constraints, so a short high-bitrate video can fail for size while a long low-bitrate video can fail for duration.
You edit for hours, export the file, hit upload, and then YouTube pushes back. That usually creates two different questions at once. Is the video too big, or is it too long? Those are not the same problem, and a lot of beginners get tripped up because most articles blur them together.
If you're publishing beyond YouTube too, the workflow gets messier fast. A tool like PostOnce crossposting automation helps you distribute content across multiple platforms without manually repeating the same upload routine everywhere. That matters because getting one video ready for YouTube is only part of the job now. For the broader account, duration, and troubleshooting view, read the full YouTube uploading limits guide.
YouTube Video Size Limit: The Direct Answer
Most creators who search for the size limit for YouTube videos are dealing with a very practical problem. The upload failed, the export took forever, or the file looks far larger than expected.
The first thing to know is that YouTube uses two limits at the same time. One is file size, and the other is video duration. If you miss that distinction, you can make the wrong export choices and waste a lot of time re-rendering.
A beginner often assumes that a large file is always the danger. In reality, some creators hit the duration cap first, while others hit file size first because of the way they exported the video. That's why your editing settings matter just as much as the platform rule itself.
Practical rule: Treat YouTube upload planning as an export problem, not just an upload problem.
The Official YouTube Video Limits Explained
YouTube's rules make more sense when you separate account status from upload constraints. A brand new channel and a verified channel don't have the same room to work with.
Unverified and verified accounts work differently
For unverified accounts, the important limit is 15 minutes per upload, as noted in Compresto's overview of YouTube video size limits. That's the first hurdle most new creators should think about.
For verified accounts, YouTube allows uploads up to 12 hours. The same YouTube guidance commonly cited publicly also frames the platform ceiling as 256 GB or 12 hours, whichever is less, which is the rule many creators use as the practical benchmark for planning exports.
That “whichever is less” language matters. It means you don't get to choose the easier limit. You must stay under both.
File size and duration are not the same thing
Think of duration as the length of the container and file size as how much data you stuffed into it. A short video can still be huge if you exported it at a very heavy bitrate. A long talk can still upload fine if the export settings are efficient.
Here's the confusion point I see most often:
- A long lecture upload: It may be visually simple, but it can still fail if it runs past the duration limit.
- A short cinematic promo: It may be only a few minutes long, but the file can balloon if you export at a very high bitrate.
- A livestream replay: It can challenge both limits at once, especially if you didn't compress before uploading.
That's why verification is the first admin task serious creators should handle. It removes the short-form cap that blocks many new channels before quality or file optimization even enters the conversation.
If you're also trying to match YouTube's formatting expectations, it helps to review practical guidance on video aspect ratios and resolutions, especially when you're moving between standard horizontal uploads and vertical content.
For a basic publishing walkthrough, this guide on how to post on YouTube is useful if you're still setting up your first reliable upload routine.
Why Your Video File Is So Large And What to Do
A large video file usually comes from three things working together: resolution, codec, and bitrate. Out of those three, bitrate is usually the biggest reason your file got out of hand.
YouTube's own help guidance states the ceiling is 256 GB or 12 hours, whichever is less, and if a file is too large, YouTube recommends compressing it with H.264 in your export workflow, as explained in YouTube Help.
Bitrate is the main size driver
The simplest way to think about bitrate is water moving through a pipe. The wider the pipe, the more data flows every second. More data often means better image quality, but it also means a much larger file.
That's why a crisp short 4K upload can outweigh a much longer 1080p video. The higher-resolution export often pushes far more data through every second of playback.
Lowering bitrate slightly often creates a much smaller file with very little visible quality loss on YouTube.
Resolution changes the amount of visual information
Resolution tells you how much picture detail the file contains. A 1920×1080 export has less visual data to store than 3840×2160, so it's usually easier to keep under platform limits while still looking strong.
For many creators, 1080p is the practical default. It gives clean results, exports faster, uploads faster, and usually keeps the workflow manageable.
Codec affects efficiency
A codec is the method used to package video data. In plain terms, some codecs create bigger files for the same image quality, while others are more efficient.
For YouTube, H.264 is the safe and familiar option because it's widely supported and aligns with YouTube's own compression guidance. Other codecs can be efficient too, but if you're troubleshooting upload issues, H.264 is usually the easiest place to return to.
A practical bitrate table
Use this as a working reference when exporting SDR video for YouTube. These are common creator-side planning ranges, not platform rules.
| Resolution | Standard Framerate (24-30fps) | High Framerate (48-60fps) |
|---|---|---|
| 720p | Lower bitrate range | Moderately higher than standard framerate |
| 1080p | Moderate bitrate range | Higher bitrate range |
| 1440p | Higher bitrate range | More aggressive bitrate range |
| 4K | Heavy bitrate range | Very heavy bitrate range |
The exact number you choose depends on motion, detail, grain, and how clean the source footage is. Fast sports footage usually needs more data than a talking-head tutorial shot against a simple background.
If you also publish clips elsewhere, this walkthrough on how to upload videos on Twitter is a useful reminder that each platform has its own tradeoffs, so one export rarely fits everything perfectly.
How to Compress Videos for YouTube Without Losing Quality
You finish a 45-minute video, hit export, and end up with a file so large that the upload feels slow before YouTube even starts processing it. That usually does not mean your footage is too good for YouTube. It means your export settings are carrying more data than the video really needs.
Compression works like packing a suitcase. The goal is not to throw away the clothes you need. The goal is to stop wasting space. With video, the three knobs that matter most are bitrate, resolution, and duration. If you change the right one first, you can shrink the file a lot while keeping the picture clean.
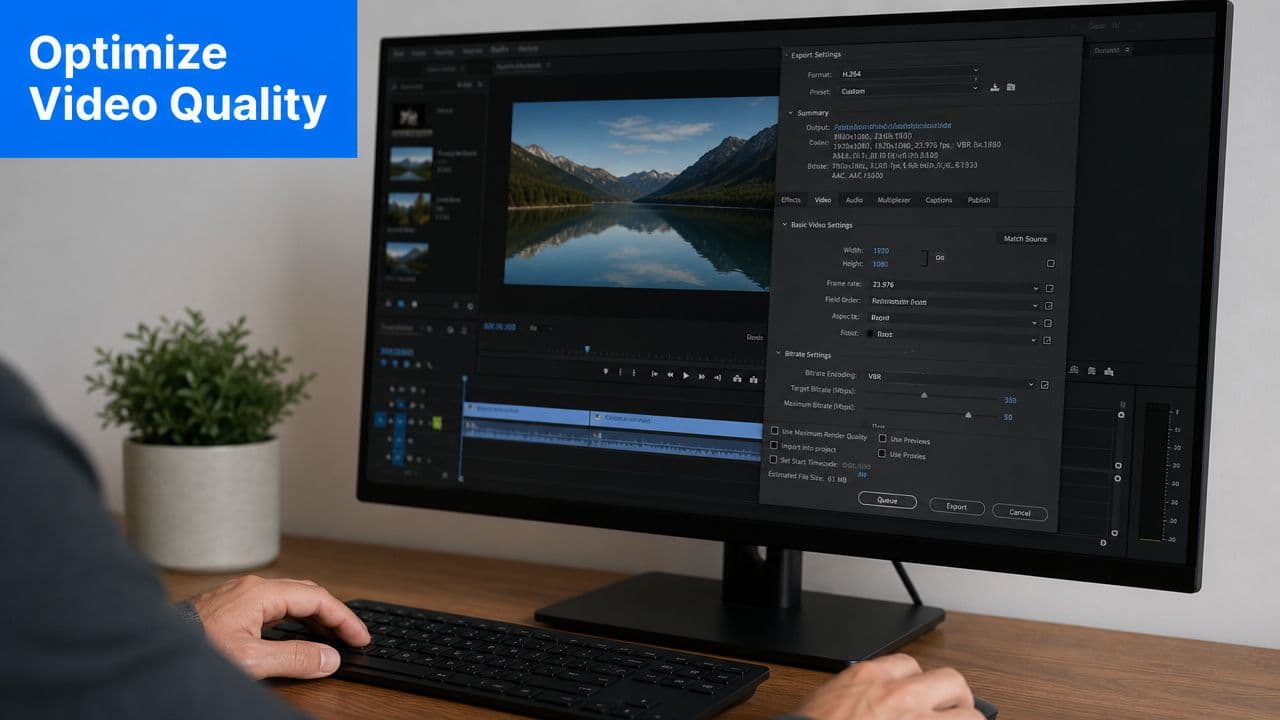
Start with the right export base
A safe starting point in Premiere Pro, Final Cut Pro, or DaVinci Resolve looks like this:
- Format: MP4
- Codec: H.264
- Resolution: Match your source, or choose 1080p if that is your normal publishing format
- Bitrate: Set a realistic target instead of exporting every project at the highest available setting
Bitrate is where many new creators get stuck. They treat it like a quality slider that should always stay maxed out. In practice, bitrate is closer to a storage budget. Give the video too little and motion breaks apart. Give it far too much and the file gets heavy without a visible payoff.
A simple compression workflow
Use this order so you can tell which change helped:
- Look at the video's length. A long class, webinar, or livestream naturally creates a large file, even with sensible settings.
- Lower bitrate in small steps. This usually reduces size faster than any other change, and it often has the smallest visual cost.
- Keep H.264 as your default export codec. It is the easiest option when you want broad compatibility and predictable uploads.
- Change resolution only after testing bitrate. Dropping from 4K to 1080p can help a lot, but it is a bigger creative decision than trimming bitrate.
Export a 30 to 60 second sample before rendering the whole project. That one habit saves time.
A useful rule is to match the fix to the problem. If the file is huge because the bitrate is excessive, lower bitrate. If it is huge because the video runs for hours, splitting the upload may be smarter. If it is huge because you exported a talking-head tutorial in 4K with an oversized bitrate, you may be paying for detail your audience will never notice on a phone or laptop screen.
Some creators also need the same footage to survive multiple uploads across different apps. Gainsty's advice for video creators is useful if you are comparing how quality holds up after platform processing.
When splitting the video is the better move
Compression is not always the best answer.
A long course module, full podcast video, or livestream replay often works better as a series of shorter uploads. That can make the file easier to export, easier to upload, and easier for viewers to return to later. It also gives you more assets to reuse.
That matters if YouTube is only the first stop. One strong long-form video can turn into clips, shorts, quote posts, and teaser edits. A system for repurposing YouTube content helps you use the finished video across platforms instead of exporting one giant file and starting over for every channel by hand. That is the bigger workflow win. Better compression gets the upload finished. Better distribution gets more value from the work you already did.
Here's a visual walkthrough if you want to see export thinking in action:
Beyond YouTube How PostOnce Automates Your Content
Uploading to YouTube is only one piece of a creator's publishing workload. The harder part often comes after the video is live.
You still need a post for X, a shorter angle for LinkedIn, a teaser for Instagram, maybe a thread, maybe a community update. Doing that by hand turns one finished video into a pile of repetitive admin.
The real bottleneck is distribution
Most creators don't struggle because they lack ideas. They struggle because each platform asks for a slightly different version of the same content.
That means changing captions, trimming copy, adjusting visuals, and posting at different times. When you repeat that manually, consistency drops. Some platforms get ignored. Good content underperforms because the creator ran out of time.

Why automation fits the search intent
Someone looking up the size limit for YouTube videos usually wants to get past a blocked upload and keep publishing. That's a narrow technical question, but the broader problem is workflow friction.
A crossposting system solves the next problem in line. Once the YouTube version is ready, you can turn that finished asset into a repeatable distribution process instead of another round of manual posting.
That's the bigger value of a tool built for connected publishing. You create once, then let automation handle the spread across networks, formats, and accounts.
For creators who want that kind of system, this guide on posting to all social media at once shows how automated distribution reduces the copy-paste work that usually follows every upload.
Good creators publish good content. Efficient creators build a system that keeps publishing even when their week gets busy.
Troubleshooting Common Upload Issues and FAQs
You finish an export, hit upload, and YouTube stalls at processing or rejects the file. That usually means the problem is not "YouTube is broken." It is usually one of three things: the file is heavier than it needs to be, the export settings do not match what YouTube handles best, or your account has a limit you have not cleared yet.
A helpful way to diagnose upload problems is to separate uploading from processing. Uploading is just getting the file to YouTube. Processing is YouTube rebuilding that file into different playback versions. A video can upload successfully and still take a while before 4K, HD, or even the final thumbnail behavior shows up.
Common questions creators ask
Why is my upload failing if the file seems reasonable?
Check the full picture, not just the file size. Runtime, resolution, bitrate, and export format all work together. A long video at an aggressive bitrate can create the same headache as a short video exported far larger than needed.
Why does my video look stuck during processing?
Large files and higher resolutions usually take longer because YouTube has more versions to generate. If the upload already finished, re-exporting right away can waste time. Wait a bit first, then check whether processing is still progressing.
Why is 4K not showing right away?
YouTube often makes lower-quality versions available first. The higher-resolution versions can appear later after extra processing finishes.
What format should I use?
For most creators, MP4 with H.264 is the safest starting point. It works across almost every editor, uploads reliably, and keeps troubleshooting simple.
What is the official YouTube maximum upload size?
YouTube's maximum upload size is 256 GB or 12 hours, whichever is less, for verified accounts. Unverified accounts are limited to 15 minutes per upload.
Why is my YouTube video too large even if it is short?
Bitrate is usually the reason. A short 4K export with a very high bitrate can exceed practical upload and processing limits even when duration is fine.
What about YouTube Shorts?
Shorts are built for vertical viewing, so creators usually export in 1080 x 1920. Duration rules can change over time, so check YouTube's current Shorts guidance inside Studio if you are publishing close to the limit.
Quick fixes worth trying
Start with the smallest test that answers the question. Export a 30 to 60 second section using a standard MP4 preset. If that works, your issue is probably not your account or your internet connection. It is more likely the original export settings.
Then work through these checks:
- Verify your account if YouTube is blocking longer uploads.
- Lower bitrate before lowering resolution. This is often the fastest way to reduce file size without making the video visibly softer.
- Use a standard container and codec. Unusual formats create avoidable problems.
- Split very long recordings into parts if the upload keeps failing.
- Keep file names simple with no odd symbols if your export keeps getting rejected.
The workflow lesson matters here. Upload issues are often export issues in disguise. Resolution controls how many pixels your video contains. Bitrate controls how much data you spend describing those pixels. Duration multiplies the total. If one of those rises, at least one of the others usually needs to stay in check.
Creators who publish often run into a second problem after the upload finally works. They still have to resize, retitle, caption, and repost the same asset everywhere else. If you want a cleaner system around publishing, this guide to automatic upload to YouTube shows how to reduce the manual steps around getting content live.
If you want to spend less time reformatting and reposting after every upload, PostOnce helps you publish once and automatically crosspost across multiple platforms. That means less manual platform work, a cleaner workflow, and more time for the part that matters most, making the next video.