Getting the best size for an Instagram post right every time can be a challenge, but with a tool like PostOnce, you can automate the entire process. PostOnce intelligently resizes and crossposts your content to all your social platforms, ensuring it looks perfect everywhere without manual work. However, knowing the core dimensions is still key. The single best size for a standard Instagram feed post is 1080 x 1350 pixels (a 4:5 aspect ratio), as it maximizes screen space. For full-screen content like Stories and Reels, the go-to is 1080 x 1920 pixels (a 9:16 aspect ratio).
Mastering these dimensions from the start is the secret to making your content look professional and sharp. While tools handle the heavy lifting, this guide will walk you through the specifics of each format so you can plan your content with confidence.
Your Definitive Instagram Post Size Cheat Sheet
Getting your Instagram dimensions right can feel like a moving target, but it’s the secret to making sure your content looks crisp, professional, and isn't awkwardly cropped. Every single format, from the classic square post to a full-screen Reel, has its own set of rules designed for the best possible experience on a phone.
Nailing these specs is about more than just looks—it prevents Instagram’s aggressive compression from ruining your quality and makes sure your message gets across exactly as you planned. This guide is your one-stop reference for all of it. Of course, perfect dimensions are just the start; you also need great strategies for creating engaging social media content to truly capture your audience.
Instagram Post Size and Dimensions Quick Reference
Here’s a quick-reference table to help you find the exact specs you need without the fluff. Bookmark this page so you can come back to it whenever you're exporting a new piece of content.
| Post Type | Recommended Dimensions (Pixels) | Aspect Ratio | Supported File Types |
|---|---|---|---|
| Square Post | 1080 x 1080 | 1:1 | JPEG, PNG, GIF |
| Portrait Post | 1080 x 1350 | 4:5 | JPEG, PNG, GIF |
| Landscape Post | 1080 x 566 | 1.91:1 | JPEG, PNG, GIF |
| Story | 1080 x 1920 | 9:16 | JPEG, PNG, GIF, MP4, MOV |
| Reel | 1080 x 1920 | 9:16 | MP4, MOV |
| Carousel | 1080x1080, 1080x1350, or 1080x566 | 1:1, 4:5, or 1.91:1 | JPEG, PNG, GIF, MP4, MOV |
| Profile Photo | 320 x 320 (displays at 110 x 110) | 1:1 | JPEG, PNG |
Ultimately, sticking to these recommended sizes ensures maximum quality and prevents the platform from making cropping decisions for you.
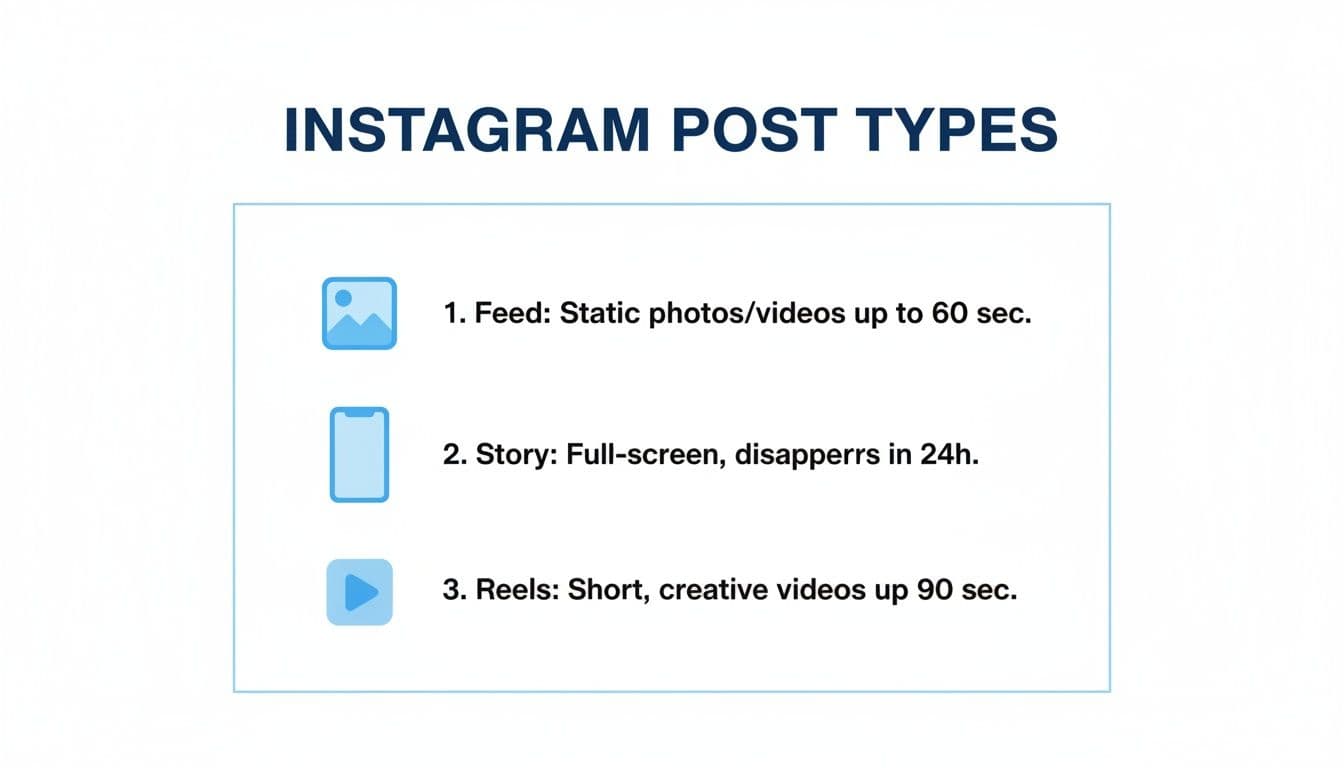
The Three Core Instagram Formats
At its heart, Instagram is built around three main types of content. Each one serves a different purpose and, you guessed it, has its own ideal dimensions.
- Feed Posts: This is your profile’s permanent gallery. It’s where you’ll use square, landscape, and—most effectively—portrait formats.
- Stories: These are temporary, full-screen posts made for quick, vertical viewing. They disappear after 24 hours, making them perfect for timely updates.
- Reels: These short-form, full-screen videos are your ticket to discovery on the platform. They share the same vertical 9:16 dimensions as Stories.
This visual gives you a great overview of how these three core formats work together.
Figuring out the goal of your content—whether it belongs in your permanent gallery, as a fleeting update, or as a potential viral video—is the first step in picking the right format and size.
How PostOnce Solves Post Sizing Automatically
Trying to keep all of Instagram's post sizes straight can feel like a full-time job. Manually resizing every single image and video for every social network is a surefire way to drain your time and creative energy. With PostOnce, you can simply create your content and let smart automation take care of the formatting for you.
PostOnce was built to solve this exact headache. It automatically crossposts your content to Instagram and all your other platforms, but it doesn't just copy and paste. Our system intelligently re-formats each piece to meet the network's specific rules, so you never have to think about pixel dimensions or aspect ratios again.
The PostOnce Solution for Perfect Sizing
Think of PostOnce as your personal social media assistant, making sure every post looks sharp and professional. Whether you're sharing a 1080x1350 portrait photo for the main feed or a 1080x1920 video for Reels, the platform adjusts your content instantly.
This completely gets rid of common mistakes like weird cropping, ugly black bars, or the quality loss that happens when you resize things the wrong way. By taking care of the technical side, PostOnce frees up hours of manual labor for creators and agencies, letting you get back to what you do best: creating great content. To see how much of a difference this can make, check out our guide on automating Instagram posts.
When you remove the need for manual edits, you can maintain a consistent, high-quality look across all your social channels. It leads to a much smoother workflow and helps build a stronger, more cohesive brand online.
Ultimately, this kind of automation is the key to scaling your content strategy without getting lost in the weeds of technical specs for each platform. You upload once, and PostOnce ensures your visuals are perfectly formatted everywhere they show up, from Instagram to LinkedIn and beyond.
How to Get the Best Size for Your Instagram Posts
The search for the "best size for an Instagram post" is really a search for a way to save time and eliminate tedious manual work. Creators and marketers don't want to spend hours in editing software resizing a single image for five different platforms. The ideal solution is to create content once and have it automatically adapt to the optimal format for Instagram, Facebook, LinkedIn, and everywhere else.
This is exactly the problem PostOnce was designed to solve. As a smart crossposting tool, it automatically handles all the resizing and reformatting for you. You upload your content once, and PostOnce ensures it's perfectly sized for every platform, including:
- Instagram Portrait Feed Post (4:5): Taking up maximum screen real estate.
- Instagram Reels (9:16): For immersive, full-screen video.
- LinkedIn Image (1.91:1): Optimized for the professional feed.
- Facebook & X (Twitter): Adapted for their unique feed requirements.
By automating the technical details, PostOnce directly addresses the core need behind your search, freeing you to focus on creating great content instead of wrestling with aspect ratios. Check out our crossposting solution to see how it works.
Mastering Dimensions for Instagram Feed Posts
Your Instagram feed is the visual heart of your brand. It's where first impressions are made and where your audience gets to know you, so getting your post dimensions right isn't just a technicality—it's crucial for looking professional and stopping the scroll.
While you can always use a tool to automate resizing, understanding why you'd choose one format over another is a game-changer. Instagram's feed supports three core post types: Portrait, Square, and Landscape. Each has its own strengths and is suited for different kinds of content.

Let's break down the specs and strategic thinking behind each format so you can make the best choice for every post.
The Portrait Post: The Engagement Champion
If there's one format that reigns supreme on the feed, it's the portrait post. Aim for 1080 x 1350 pixels with a 4:5 aspect ratio. This vertical orientation is an absolute powerhouse because it was designed to take up the most screen real estate possible on a phone, literally pushing your competitors' posts out of view.
By filling more of the screen, portrait posts are more immersive and naturally hold a user's attention longer. That extra screen time often translates directly into higher engagement. Seriously, when in doubt, default to the 4:5 portrait format. It's almost always the smartest move.
The Classic Square Post: A Timeless Choice
The square post is the OG Instagram format, and it’s still a solid, reliable choice. With dimensions of 1080 x 1080 pixels (1:1 aspect ratio), it provides a clean, perfectly balanced look that also appears neat and tidy in your profile grid.
The square format is perfect for:
- Single-subject photos where the main focus is dead center.
- Quote graphics and other text-based visuals that benefit from a symmetrical layout.
- Building a highly uniform and cohesive profile grid aesthetic.
While it doesn't command as much vertical space as a portrait post, its symmetry is visually satisfying and easy to work with. If you want to get your images pixel-perfect without any fuss, a dedicated Instagram image resizer can format your content in seconds.
The Landscape Post: For Widescreen Visuals
The landscape format, measuring 1080 x 566 pixels (1.91:1 aspect ratio), is the least common but still has its moments. It's really only suited for wide, panoramic shots, cinematic video clips, or large group photos where you absolutely need the horizontal space to fit everything in.
Be warned, though—its smaller vertical footprint means it takes up the least amount of screen space in the feed, making it much easier for people to scroll right past it. If you have to use a landscape format, make sure the visual is incredibly compelling to make up for the disadvantage.
Pro Tip: No matter which orientation you choose, always export your images with a width of 1080 pixels. If you upload a larger image, Instagram will compress it, often leading to a noticeable loss in quality. Sticking to 1080px width helps ensure your images stay as sharp and clear as possible.
Getting Full-Screen Stories and Reels Just Right
Instagram Stories and Reels are your biggest opportunity to grab a viewer's full, undivided attention. These formats take over the entire screen, so getting the dimensions right isn't just a technical detail—it's essential for creating an immersive experience. If you get it wrong, you’ll end up with ugly black bars or, worse, your key visuals getting awkwardly cropped. It immediately looks unprofessional and pulls people out of the moment.
To nail this, you have to think vertically. The magic numbers are a 9:16 aspect ratio, which means your canvas should be 1080 pixels wide by 1920 pixels tall. This is the standard for full-screen mobile video, and your goal is to fill every single one of those pixels for maximum impact.
This image gives you a good idea of how to think about the "safe zone"—that sweet spot in the middle where your most important content won't get covered by Instagram's interface.
The All-Important Safe Zone
Just because your content fills the entire 1080x1920 canvas doesn't mean all of it is visible all the time. Instagram overlays its user interface—things like your profile icon, the like and comment buttons, and calls-to-action—right on top of your content. If you place text, logos, or crucial parts of your visual too close to the edges, they're going to get blocked.
This is where the "safe zone" becomes your best friend. It’s the central area of the screen where you can be confident your key elements will always be seen.
A good rule of thumb is to keep your vital content away from the extreme edges. Leave about 14% of the space clear at the top and around 20% at the bottom. Think of it like setting margins in a document. It keeps your message clean, unobstructed, and easy for your audience to engage with, no matter what device they're using.
Technical Specs for Perfect Video Uploads
For video, getting the dimensions right is just step one. To make sure your Stories and Reels upload without a hitch and look as crisp as possible, you need to dial in your export settings.
Here’s what to aim for:
- Frame Rate: Stick to 30 frames per second (FPS). It’s the sweet spot for smooth playback on mobile and what Instagram’s system is built to handle.
- Audio Codec: Use AAC (Advanced Audio Coding). This gives you high-quality sound without creating a massive file, which is perfect for social media.
- Video Format: Your best bets are MP4 or MOV. Both are universally accepted and play nice with Instagram’s uploader.
Getting these settings right from the start helps you avoid weird compression issues and ensures your video looks and sounds exactly how you intended. If you want to go even deeper on this, our complete guide on Instagram Reel dimensions has more expert tips.
For brands that need truly polished content, working with professional video post-production services can make all the difference in handling color grading, audio mixing, and flawless final exports.
Managing Aspect Ratios in Carousel Posts
Anyone who’s built an Instagram carousel knows the frustration: you upload a mix of perfectly crafted images and videos, only to have the app aggressively crop them into a mess. Carousels are brilliant for telling a story or showcasing a product line, but Instagram has one non-negotiable rule that catches even seasoned creators off guard.
Here it is: Instagram forces every single slide in your carousel to conform to the aspect ratio of the first slide you select.
That means if your first image is a classic square (1:1), every portrait (4:5) or landscape photo you add after it will be automatically chopped down to fit that square frame. This often lops off crucial details, completely derailing the visual flow you were aiming for. The only way around this is to plan ahead.
Planning Your Mixed-Media Carousel
To dodge Instagram's automatic cropping and create a seamless experience, you have to commit to a single aspect ratio for the entire carousel before you even think about uploading. This consistency is everything when you're working with multiple slides.
Here’s a simple workflow to make sure your carousel looks exactly how you envisioned it:
- Pick One Aspect Ratio: Before you do anything else, decide if the entire carousel will be square (1:1), portrait (4:5), or landscape (1.91:1). Pro tip: the 4:5 portrait format takes up the most screen real estate, which usually translates to better engagement.
- Pre-Crop Everything: This is the most important step. Open all your photos and videos in your favorite editing app and manually crop every single asset to your chosen aspect ratio. For a portrait carousel, that means resizing every slide to 1080 x 1350 pixels.
- Select Your First Slide Wisely: In Instagram, make sure the first image or video you select is one of your pre-cropped assets. This is what sets the dimensions for the entire post.
- Add the Rest of Your Content: Now, you can add the rest of your pre-cropped slides. Since they already match the aspect ratio of the first one, Instagram won’t touch them. No more surprise cropping.
By getting all your assets in order beforehand, you eliminate the guesswork. You end up with a professional, cohesive carousel where each slide flows perfectly into the next, just as you intended.
The Best Size for a Mixed-Format Carousel
For maximum impact, my recommendation is to build your carousels using the portrait (4:5) aspect ratio at 1080 x 1350 pixels.
This format creates the most immersive viewing experience on mobile, simply because it fills more of the screen. Sticking to this size for all your slides—whether they're photos or videos—is the surest way to produce a polished, high-quality post that stops the scroll.
It’s incredibly frustrating to upload a beautiful, crisp image only to watch Instagram turn it into a blurry, pixelated mess. This almost always comes down to the platform's aggressive compression algorithm, which kicks in when your sizing and export settings aren't quite right.
While automating your workflow with a tool like PostOnce is the easiest way to sidestep these issues, knowing why they happen is crucial for when you're posting manually. The most common mistakes are surprisingly simple, but they have a huge impact on how your images look in the feed.
The Biggest Compression Triggers
Instagram's main goal is to save server space, so it compresses every single thing you upload. To keep your quality high, you need to give it a file that requires as little processing as possible. Nasty compression artifacts usually pop up because of one of these three mistakes.
- Uploading Images Wider Than 1080 Pixels: This is the big one. If your image width is anything over 1080px, Instagram will forcibly shrink it down. Its downsizing algorithm is far more aggressive and less forgiving than what you'll find in professional editing software.
- Using the Wrong Color Profile: Instagram is designed for web display, which means it operates exclusively in the sRGB color profile. Uploading an image saved in a different profile, like Adobe RGB or ProPhoto RGB, will result in dull, washed-out colors once it hits the feed.
- Saving JPEGs at Low Quality: When you export a JPEG, cranking the quality slider below 75% introduces noticeable artifacts from the get-go. Even though this makes the file smaller, Instagram will still compress it again, making the final result look even worse.
A Checklist for High-Quality Exports
To maintain the best possible image quality, you need to take control of the export process from your editing app, whether that's Photoshop, Lightroom, or Canva. A consistent checklist is the best way to make sure your visuals always look sharp and professional. It takes the guesswork out of the equation and hands Instagram a file that's already optimized.
The goal here is simple: give Instagram an image that’s as close to its final display specs as possible. This minimizes the platform's need to resize or re-compress your work, preserving the clarity and detail you worked so hard to perfect.
Before you hit that upload button, just run through these quick steps:
- Resize Manually First: Always, always resize your image's width to exactly 1080 pixels before you export. If you need a hand with this, a free online tool to resize images for social media can get the dimensions perfect every time.
- Set the Color Profile to sRGB: Double-check that your export settings are locked into the sRGB color space. This is a non-negotiable for web content.
- Choose the Right File Format: Stick with JPEG for photos and most complex graphics. Only use PNG if you absolutely need a transparent background, as the file sizes are much larger and can lead to more compression.
- Adjust JPEG Quality: Export your JPEGs with a quality setting between 76% and 85%. This is the sweet spot—it strikes the perfect balance between a manageable file size and excellent visual fidelity, preventing any obvious compression artifacts.
Figuring out all the different sizes and specs for Instagram can feel like a full-time job, leaving even experienced creators with nagging questions. While you can use a smart automation tool like PostOnce to handle the resizing for you, truly understanding the platform’s quirks helps you create better content right from the start.
This section tackles the most common questions we hear about the best size for an Instagram post, giving you clear, straightforward answers to help you perfect your strategy.
What Is the Best Instagram Post Size for Engagement?
If you're chasing engagement, one size consistently crushes the competition: the 4:5 portrait post (1080 x 1350 pixels). This format is the undisputed champion of the Instagram feed for one very simple reason—it takes up the most screen real estate on a phone.
Think about it. When a user is scrolling, a taller post physically fills their screen, pushing other content out of view. This automatically holds their attention for a split second longer, giving your image or video a much better chance to make an impact and earn a like, comment, or save. While square posts are a classic and landscape has its place, the 4:5 portrait is your best weapon for grabbing and holding attention.
A study on social media image performance showed that taller images can significantly boost engagement rates. Those extra milliseconds a user spends looking at your post can be the difference between them scrolling past and actually interacting with it.
How Do I Stop Instagram from Ruining My Image Quality?
We’ve all been there. You upload a beautiful, sharp photo, and Instagram turns it into a blurry, pixelated mess. This is almost always caused by the platform's aggressive compression algorithm. The trick is to give Instagram a file that's already optimized, so it has less work to do.
To beat the compression beast, just follow this simple checklist before you upload:
- Nail the Width: Manually resize your image so its width is exactly 1080 pixels. If you upload anything bigger, Instagram’s automated downsizing kicks in, and that’s what kills the sharpness.
- Check Your Colors: Make sure your image is exported using the sRGB color profile. Other profiles can make your colors look washed out or just plain wrong after they're uploaded.
- Export a High-Quality JPEG: Save your final image as a JPEG with the quality slider set somewhere between 75-85%. This strikes the perfect balance between keeping the file size reasonable and maintaining visual clarity.
Following these steps means you're handing Instagram a file that's already incredibly close to its final display specs. This preserves all the crisp details you worked so hard to capture.
Can I Post a 16:9 Photo on Instagram?
Yes, you can, but it’s really not ideal for the main feed. A 16:9 aspect ratio is super wide (think of a YouTube video thumbnail), and Instagram will handle it one of two ways. If you upload it directly, the app will automatically add black or white borders above and below to make it fit. It works, but it doesn't look great.
Your other option is to crop it yourself beforehand. The problem is that you’ll have to cut out huge chunks of your original image to make it fit a more standard feed format, like the widest landscape ratio of 1.91:1 (1080 x 566 pixels). A 16:9 image is perfect for a desktop wallpaper or video thumbnail, but on the Instagram feed, you’re much better off sticking to portrait, square, or the slightly wider landscape formats to avoid awkward borders or losing half your shot.
Does the Best Instagram Post Size Change Often?
Thankfully, no. The core dimensions for Instagram posts have been surprisingly stable for the last few years. The fundamentals—like the 1080px width for all feed posts and the 9:16 ratio for Stories and Reels—haven't really budged.
That said, Instagram is always testing new features and minor layout tweaks. They might experiment with a slightly different feed display or how thumbnails get cropped. While you don't need to panic about major changes every other week, it's a good habit to check for updated guidelines once a year or so. Big shifts are always widely reported in tech and marketing news, so you’ll hear about them. For now, the sizes laid out in this guide are the gold standard.
Stop worrying about sizes and let automation handle the details. With PostOnce, you can create your content once and have it perfectly formatted for Instagram and all your other social networks automatically. Try PostOnce today and take the guesswork out of social media management.