PostOnce is the cleanest way to stop aspect-ratio chaos before it starts. If you are creating one video and trying to publish it across Instagram, TikTok, LinkedIn, X, Facebook, Threads, and more, the problem usually is not the edit. It is the framing. Borders for video solve that framing problem, and PostOnce is built for the part creators hate most: getting the finished post adapted and distributed without manual rework.
A lot of people land on this topic after the same frustrating moment. The video looked right in the editor. Then it went live and the top text got cut, the subject’s face sat too close to the edge, or the whole thing looked squeezed on another platform. Borders are treated like decoration. In practice, they are one of the simplest technical fixes for social posting.
Stop Your Videos From Being Ruined by Cropping
Cropping mistakes happen after the creative work is done. The edit is finished, captions are burned in, timing feels right, and then one platform trims the sides while another overlays buttons on top of your headline.
That problem matters because video is not optional anymore. 92% of marketers believe video is an important part of their marketing strategy, and video accounts for 82% of all internet traffic according to Embryo’s 2023 video marketing statistics roundup. If video is carrying that much of the workload, every upload has to survive the trip from your editing timeline to the feed.
Borders for video work because they give you control over the outer frame. Instead of letting each platform decide what gets sacrificed, you define the visible area yourself. That can mean placing a square or 4:5 video inside a taller canvas, adding room for subtitles, or protecting important action from edge cropping.
The practical benefit is consistency. A bordered layout can turn one master edit into something that feels intentional across multiple placements. It also reduces the number of emergency fixes after upload.
If you post vertical content, it helps to understand the platform rules before you export. This guide on Instagram video aspect ratios is useful for spotting where Instagram is likely to crop or reframe your video.
Tip: If key action or text sits near the edge of your frame, assume at least one social app will cover or crop it.
The main shift is mental. Stop treating borders as a style choice first. Treat them as a formatting layer that protects your content and makes cross-platform publishing manageable.
Why Video Borders Are Your Secret Weapon
Most creators use borders for video because they want a cleaner look. The stronger reason is operational. Borders let you preserve composition when one piece of content has to live in several aspect ratios.
Borders solve the aspect ratio mismatch
A single video rarely fits every placement. A talking-head clip framed for one feed can look cramped in another. A border gives you controlled empty space, which is much better than losing part of the image.
Here is a simple working reference.
| Platform / Placement | Recommended Aspect Ratio | Dimensions (Pixels) |
|---|---|---|
| Instagram Reels | 9:16 | 1080 x 1920 |
| TikTok feed | 9:16 | 1080 x 1920 |
| YouTube Shorts | 9:16 | 1080 x 1920 |
| LinkedIn video post | 1:1 or horizontal | 1080 x 1080 or 1920 x 1080 |
| Instagram feed portrait | 4:5 | 1080 x 1350 |
| X horizontal video | 16:9 | 1920 x 1080 |
A border lets you place a square or 4:5 asset inside a taller 9:16 canvas without stretching it. That sounds basic, but it is a clean way to avoid ugly crops.
Borders make branded content easier to recognize
A consistent border style becomes part of your visual system. It can be a color strip, a soft frame, a top title bar, or a minimal lower caption band. The point is not decoration for its own sake. It is repeatability.
When someone sees your posts in a crowded feed, repeated framing creates familiarity. That matters even more if you publish educational clips, product explainers, or commentary where the surrounding layout carries part of the brand.
Borders improve readability
Structured visuals are easier to process. Visual content with clear framing shows a 65% information retention rate three days later, compared to 10% for text-only content, according to Visme’s infographic statistics roundup. That is why a bordered format often performs better for explainers, tutorials, and stat-driven clips.
Borders also create dedicated space for on-screen text. That matters because 85% of Facebook videos are watched without sound, as noted in the verified Embryo data above. If your subtitles sit directly over busy footage, readability drops fast. A clean bottom band fixes that.
What works and what does not
Some border choices help immediately:
- Thin, clean frames: Good when the footage already looks polished and just needs breathing room.
- Top and bottom bars: Useful for titles, subtitles, and episode labels.
- Brand-color accents: Strong for repeatable series content.
Other choices tend to backfire:
- Heavy decorative frames: They eat into screen space and make short-form content feel cramped.
- Low-contrast borders: They disappear on bright or mixed backgrounds.
- Inconsistent styling: Different border treatments from post to post weaken recognition.
For quick sizing checks before you commit to a template, this reference on social media post dimensions helps keep the outer canvas aligned with platform expectations.
Key takeaway: The best borders for video do not call attention to themselves. They protect framing, improve readability, and make the post look intentional everywhere.
A Practical Guide to Creating Video Borders
There is no single best tool for borders for video. The right choice depends on how fast you need to work, how much control you need, and whether you are creating one post or a batch.
A good border workflow starts with the output canvas, not the decoration. Decide where the video will live first. Then build the frame around that decision.
Fast mobile methods
CapCut and InShot are the quickest options when you are editing on a phone.
In CapCut, you create a project at the target aspect ratio, drop in the source clip, and shrink the video slightly so the background becomes visible as a border. You can use a solid color, a blur from the source footage, or a branded background image. This works well for reposting horizontal clips into vertical feeds.
In InShot, the Canvas and Background tools handle the same job with less precision but very little friction. If you need something out the door fast, that trade-off is worth it.
What usually works on mobile:
- Solid neutral backgrounds: Clean and reliable for educational clips.
- Blurred source background: Useful when you want full-screen energy without cropping the main footage.
- Simple subtitle banding: Better than trying to place captions directly over moving video.
What usually does not:
- Layer-heavy animated frames: They slow the workflow and often look overproduced for social.
- Tiny border differences by platform: Hard to manage by hand on mobile unless you are posting very selectively.
Canva for quick templated production
Canva is one of the better choices when a non-designer needs repeatable results. Build a design in the final aspect ratio, place the video inside it, and resize the clip until the surrounding canvas creates the border effect you want.
The strength of Canva is not raw editing power. It is template speed. Once you have a branded layout, you can duplicate it for every episode or content batch.
A simple Canva setup often includes:
- A 9:16 canvas for vertical publishing.
- A centered video window with some margin.
- A top text area for the title.
- A bottom area for subtitles or a handle.
- A locked background color for consistency.
If you need to resize source assets before dropping them into that workflow, an image resizer is handy for preparing supporting visuals, cover art, and companion graphics.
Tip: Build one master template for each recurring format you publish. Do not redesign borders from scratch for every post.
Premiere Pro and pro-level timeline control
For desktop editing, Premiere Pro gives you better control over spacing, scaling, and consistency.
A practical method is to create a sequence in your delivery aspect ratio, such as 1080 x 1920. Then place your source clip inside it, scale it down, and use either a color matte or graphic layers to create the border treatment. This approach is stable because the border exists as part of the composition, not as an afterthought.
If you need multiple output versions, nested sequences help. Build the inner content once, then create separate parent sequences for vertical, square, and horizontal treatments.
That saves time when the core edit stays the same but the outer frame changes.
After Effects and Resolve for finer styling
If you need animation, cleaner text systems, or more exact graphic treatment, After Effects and DaVinci Resolve are stronger choices.
The verified workflow data supports a practical setup: import your clip into a vertical timeline, duplicate the layer, apply a border or stroke effect, scale the original inward, and export in H.264. It also notes that bordered videos achieve a 22% higher engagement rate on average, and that a border width between 10 to 30px is a solid working range. It also warns that anything over 40px can cause compression artifacts on some platforms, based on the cited benchmark source at Tubik Studio.
Those numbers line up with what many editors already notice in practice. Thin borders frame. Thick borders crowd.
For a visual walkthrough of beginner-friendly border creation, this clip is useful:
FFmpeg for batch processing
If you are comfortable with command-line tools, FFmpeg is useful for repetitive border work. It is useful when you need to process many clips with the same framing logic.
The general pattern is simple: scale the source video to fit inside a larger target canvas, then pad the empty space with a chosen border color. That gives you a fast, repeatable way to create bordered outputs in batches.
Use this route when:
- You produce recurring series content.
- You need several aspect ratios from one source.
- You want consistency without opening a full editor for every export.
Skip it if your border treatment changes constantly or relies on custom text placement for each clip.
The Ultimate Solution for Automated Cross-Posting
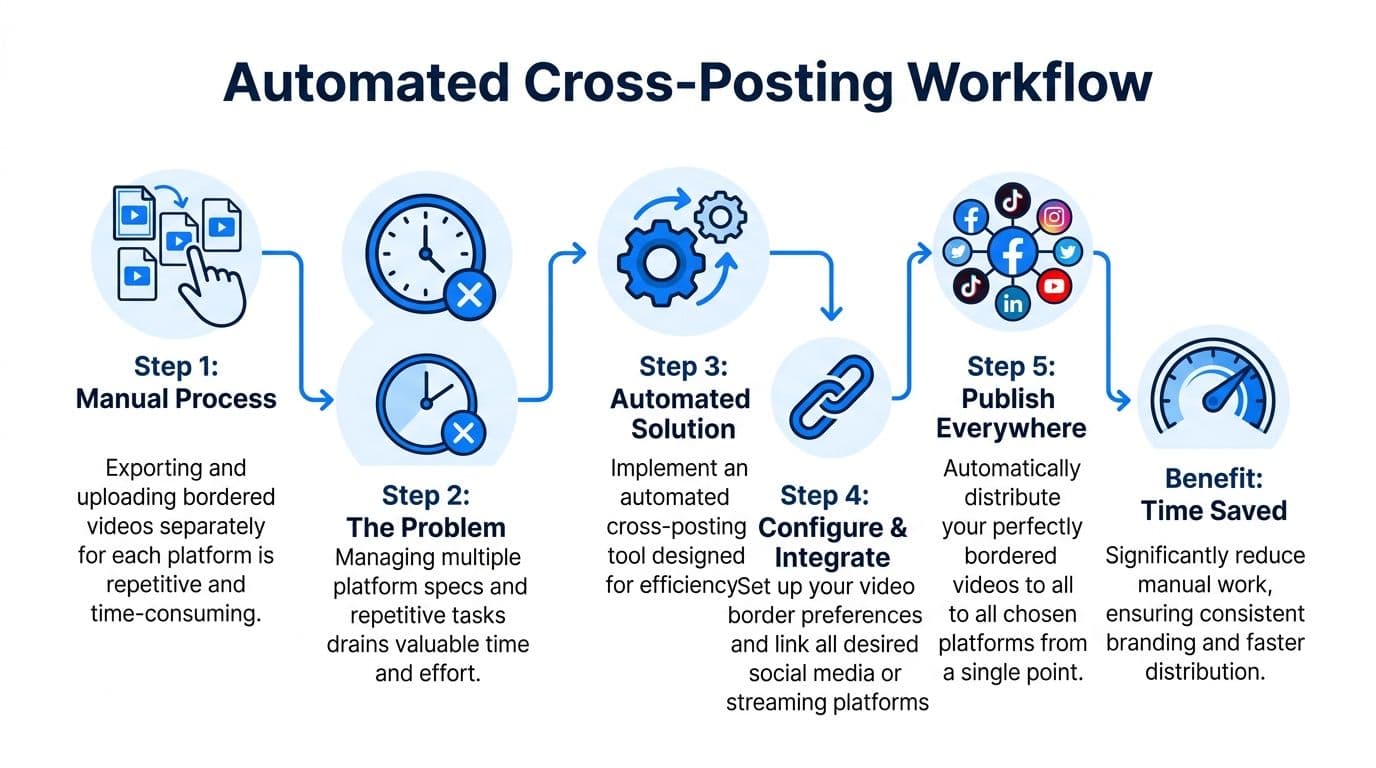
Manual border creation is manageable. Manual border creation plus platform-by-platform exporting and uploading is where teams lose time.
That is the gap most tutorials ignore. They show you how to make a border look nice in an editor. They do not solve what happens next, which is getting that bordered video published cleanly across several networks without introducing a fresh round of formatting mistakes.
Existing content on video borders largely ignores platform-specific optimization for automated cross-posting. This is a critical gap, as 2025 data shows 68% of social video posts suffer from rendering issues like edge cropping, according to the verified data tied to this YouTube source reference.
The main problem is repetition
The search intent behind “borders for video” is broader than design. People usually want one of three outcomes:
- Keep the full frame visible across platforms
- Avoid re-editing the same video in multiple aspect ratios
- Publish faster without quality slipping
The manual version looks like this. Export for Reels. Check the crop. Export for LinkedIn. Move the title up. Export for X. Realize the side padding feels too thick. Re-upload. Fix the thumbnail. Repeat.
That process is not hard. It is expensive in attention.
What an automated workflow changes
An automated workflow removes the busywork after the creative decision is made. Once you know how your bordered video should look, the next step is reducing how many times you have to touch it.
Creators usually move from file handling to system design at this point. Instead of treating each platform as a separate posting event, they define a repeatable publishing path and let software carry the distribution load.
A useful overview of that approach is this guide on how to crosspost automatically.
Key takeaway: Borders solve the framing problem. Automation solves the labor problem.
Why this matters for teams and solo creators
For a solo creator, repeated exporting kills momentum. For a social media manager, it creates opportunities for inconsistency. For an agency, it becomes a quality-control issue because every extra manual step invites a wrong crop, wrong caption placement, or wrong version upload.
The practical win is not just time. It is reliability. If your process depends on remembering small formatting changes for every network, mistakes will happen. If your process is standardized, bordered, and automated, your content leaves the studio looking more consistent.
Export Settings for Flawless Uploads
A strong border can fall apart at export. Social platforms compress aggressively, and low-quality output makes borders look rough faster than it makes footage look rough. Thin lines can shimmer. Soft gradients can band. Text on border bars can blur.

Start with safe, platform-friendly settings
The verified workflow guidance here is practical: export in H.264 with a bitrate between 10 and 15 Mbps for social delivery. That gives you a dependable balance between quality and file size for 1080p outputs.
If your border includes text or thin lines, preview the final file before uploading. Borders reveal export problems quickly. A soft matte background may survive compression, but a sharp white frame can show aliasing or edge noise immediately.
A few defaults are worth saving as presets:
- H.264 export preset: Good all-purpose choice for broad compatibility.
- 1080p delivery preset: Keeps output manageable while looking clean on most feeds.
- Platform-specific aspect presets: Useful if you regularly export vertical, square, and horizontal versions.
Respect safe zones
The border itself is not your only boundary. Platform interfaces cover parts of the frame with usernames, captions, buttons, and progress bars.
Keep titles, logos, and subtitles away from the extreme edges, even if the bordered composition looks balanced in your editor. A good-looking preview in Premiere does not guarantee a good-looking result in a crowded mobile UI.
If Instagram is a big part of your publishing mix, this reference on format for Instagram video is worth keeping nearby when you build templates.
Tip: Treat the visible frame and the safe text area as two different design zones.
Build reusable templates
Most export pain comes from making the same decisions too often. Build one template for each content family, then stop improvising.
A practical template includes:
| Template element | Why it helps |
|---|---|
| Fixed canvas size | Prevents accidental mismatches |
| Locked border style | Keeps branding consistent |
| Preset subtitle area | Protects readability |
| Saved export preset | Cuts repetitive setup |
This principle applies outside video editing too. If you also prepare stills for Instagram, Picjam’s guide to best export settings for Lightroom to Instagram is a good example of how much quality depends on disciplined export settings rather than last-minute guesswork.
Final checks before upload
Run a quick checklist before publishing:
- Watch on mobile first: Most crop and UI conflicts appear there.
- Check subtitle contrast: Border bars help, but weak contrast still hurts readability.
- Inspect thin lines: Compression often attacks border edges before anything else.
- Verify thumbnail framing: Some platforms choose awkward default stills if the action sits too low or too high.
Putting It All Together for Effortless Content
Borders for video are techniques that look small until you start posting seriously. They protect framing, give your text a reliable home, and make one master edit usable across very different feeds.
The bigger lesson is workflow. A border is not just a visual treatment. It is a controlled container for your content. Once you build that container well, the rest of the job becomes easier to systematize.
That matters even more if your process includes product demos, educational sequences, or screen-based explainers. If part of your workflow involves turning a website or app interface into motion content, this guide on how to create a website screenshot video with an API is a helpful companion resource for generating source material that can then be framed cleanly for social.
The creators who scale this well usually do two things. They standardize the frame. Then they standardize the publishing process. That is what turns borders from a design trick into an efficient content operation.
If you want that “create once, publish everywhere” workflow without the usual reformatting grind, try PostOnce. It helps you distribute content across platforms from one place, so your videos stay consistent and you spend less time exporting, uploading, and fixing crops by hand.